

Floating Floors can really enhance a room if they are installed carefully.
Floating floors can be a relatively cheap, quick and easy update for your floors, the trick to getting a great floor is, as usual, all in the preparation.
Through all the fickle trends of the last century, one style of flooring has consistently triumphed: floorboards.
They come in so many different types, shades and widths of timber, that you’ll never be hard up finding a timber floor that suits. However, they can be expensive.
A much cheaper and often more practical alternative is an engineered timber floating floor. It’s literally a floor that “floats” on top of your existing one.
Floating flooring are manufactured (man-made) timber boards, often made with an MDF or a plywood substrate with either a solid timber, timber veneer or manufactured laminate surface.
They are also known as laminate flooring and can be made of bamboo as well.
Boards come in a huge variety of timber varieties (colour, grain etc.), widths and quality.
They are relatively easy to install as you literally clip and tap them into place.
Once you’re on a roll, laying a floating floor is not that difficult, but success lies in fastidious preparation and attention to detail. Oh, and it can be taxing on the knees.
Floating floors can be installed over just about any existing floor, just get your prep right.
Boards are normally sold in pre-bundled packs, so you will probably end up with more than you need. This excess may come in handy for repairs down the track.
Be very careful with newly poured concrete floors, they take months to fully dry out and you can’t lay your floor until they have.
Measuring
Measure up your floor and purchase enough foam underlay and panels to allow for 10% wastage.
Your floorboards must not extend from one room to another. Different rooms will have different temperature and humidity conditions, which means the boards will expand and shrink at different rates in each room.
That expansion and shrinkage is managed by laying the floor with expansion joints between the flooring and walls.
Really large rooms may need to be divided up into smaller sections.
The level of new floor will be higher than the existing one so investigate any issues that change may cause.
For example will your new boards will fit under existing skirting boards or you will have to remove then replace them later. Check the gap under doors too.
Use the string line to see if your walls are straight. If the walls are bowed you will have to mark the bowed profile on the first row of boards and cut these length-wise to fit. This will not be much fun but the end result will be really dreadful if you don’t.
Note where boards will meet up with other floor surfaces. You will need to accommodate any changes in floor height and cover joins between the two materials.
Preparation
A lot of manufacturers recommend leaving the panel packs for a week or so in the room to acclimatise, that will minimise expansion once the floor is down.
You can run a floating floor over concrete, plywood, sheet vinyl, even ceramic tiles, but you need a level, clean, dry, stable floor to start with.
If your floor surface is not level it will show in the finished job. Do not underestimate just how much it will show.
Leveling your floor may mean having to pack out low spots or use a cement based leveling compound on cement floors. High spots will need to be sanded or ground down.
Make sure you secure anything that’s loose and eliminate any creaks and squeaks. If your sub-floor is covered with something like lino that’s loose or in poor condition it may be best to pull it up.
Vacuum the room immediately before starting.
Underlay
Concrete flooring will require a moisture barrier and all surfaces need a foam underlay. The underlay will run in the same direction that the floating floor is laid.
Roll out one width of the underlay the length of the room and cut to fit. Lay your underlay as you go rather than in one hit. Follow the instructions and overlap the lengths and tape the seams together with the appropriate tape.
You may want to consider additional acoustic insulation beneath your floating floor if you don’t have a concrete substrate; there are many excellent products now available that can drastically reduce noise between floors.
Laying the floor
If you have skirting boards, it’s usually easiest to just leave them in place. You can run beading around the edges when you’re done to cover any rough joins if the floating floor doesn’t fit underneath.
Architraves are often best cut at the bottom to allow the boards to slide underneath.
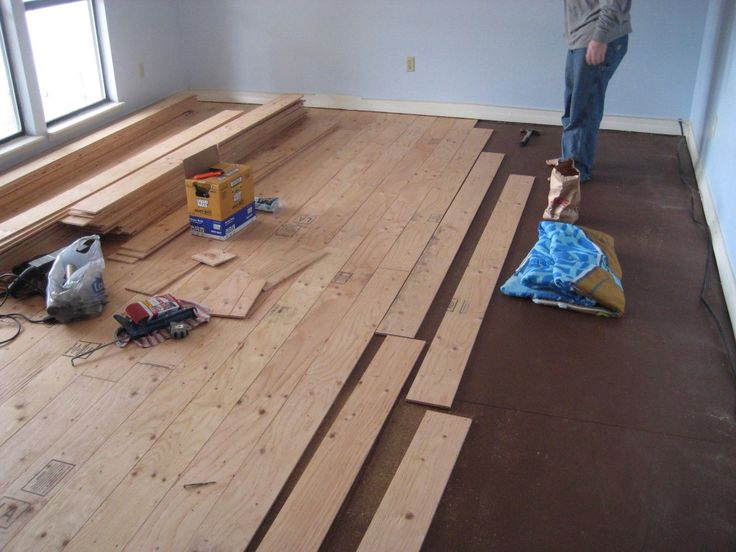
Place your first row of panels lengthways along the longest wall. Laying boards in the direction of incoming light works well in square rooms.
Always lay the boards with the cut end against the wall, the tongues should face into the room towards where the next board will be joined on both the short and long sides.
Use spacers at each end and against adjacent walls to allow for a 12mm expansion joint at the perimeter.
You will also need to trim boards to give you the same expansion joint around pipes or other structures projecting from walls such as columns.
Tap the panels together using a rubber mallet and block, never hit the boards directly with a hammer or mallet.
When you get to the end of a row, you’ll need to cut your last piece to fit manoeuvre it into place with a pinch bar.
If any of your rows end with a gap of less than 300mm between them and the wall, you will need to trim the first board against the wall where you started, to make a larger gap for the last board.
When you’re cutting the boards with a handsaw have the “good” side up and you won’t splinter the timber finish. With and electric jigsaw or a circular saw, face the good side down. Handsaws cut on the downward stroke, power tools cut upward.
Continue with the next row in the same way, you can use the offcut from the last board as the first board in the next row. Again make sure these shorter end boards are at least 300mm long.
Randomly staggering the joins across the floor will not only look better, it will make the floor stronger.
A plank that runs across a door will have to be notched to fit inside the doorway.
Use your rubber mallet and block to tap the boards together both lengthways and widthways as you go.
As you work, keep checking that the boards are sitting together snugly and are lying flat. Tap boards to close any gaps.
After every few rows check that the flooring is square by either measuring the rows against the opposite wall if that wall is square or measure back to the wall you started with.
Take your measurements at several places along the row. Continue to do this as you go.
If you start to see any undulations in the boards, stop. They will not go away. You will need to take up what you’ve done and go back to the floor levelling stage.
Most floating floors these days do not require glue or nails.
Finishing
When you get to the final row, you’ll almost definitely have to trim the width of your final row to fit, allowing for the 12mm expansion joint. This is where you’ll need your skills with the pinch bar to wedge the final row into place unless you’ve removed the skirting boards.
When the room is finished, remove the spacer blocks. Replace the skirting boards or run beading or quad around the perimeter to conceal the rough edges.
Simply measure and cut to fit beading. You may choose to stain the beading the same colour as your floorboards for a seamless finish.
Unless your boards needed to be glued, you will be able to walk on the floor right away and move your furniture back in.
Safety tips
- Use kneepads, goggles and dust masks when laying any floor.
- Ensure the room is well ventilated.
- Take extra care when using power tools.
The DIY information provided is general in nature. You should consult experts to get full details relating to your job.
House prices are on the rise. Find out the value of your property now.
Get a free online property report from Hicks Real Estate. It takes seconds.
Hicks Real Estate Team
Hicks Real Estate is a Brisbane based, full-service real estate agency supporting buyers and sell as well as renters and property investors. With almost 20 years experience in the local market, we are the real estate experts you can rely upon.


This will lessen the cost of having a floating floors.Great article.